Showing posts with label Gift Items. Show all posts

Thursday, February 18, 2016

iPhone Valentine Conversational Heart Candy Treats Anyone?

My niece is now 6 years old and in the 1st grade.  Sigh....in my head, she's still a toddler.  Her parents seriously need to stop feeding her.

So this is what Auntie Ching made for her school valentines this year.  It had to be super quick because Auntie Ching has been a workaholic and started on this project at close to midnight on a work night.  I found this super cute iphone valentines free printable here.  Thank you Amy Locurto at www.livinglocurto.com!! 

It's got to be cheating when one uses a digi print out, trimmed to fit and then attached/secured around a box of conversational heart candies with scotch tape?   I felt so guilty that I just *HAD* to add a glittered heart sticker adorned with a rhinestone.  Even that was cheating since those were Jolee's stickers I grabbed super quick at Michaels.


In my defense, I did try recreating one using embossed Recollections pink cardstock since my niece is still thankfully crazy about pink.  (Grr..what happened to Bazzil?) But they looked so cheesy. At  almost 1 AM, I succumbed to full on cheating by using the digi print outs.  (Hangs head down in shame.)  In person, when all stacked up, they were super cute.

Nevertheless, my sister-in-law told me that my little niece was beyond thrilled to address each valentines with the names of her friends the night before. And they were apparently a hit as all the kids were using their valentines to pretend take pictures of each other.  Aww, that's cute!

As long as the kids liked it, that's all that counts right?


"iPhone Valentine Conversational Heart Candy" Treats
Paper: Staples White 110# Cardstock
Ink: Printed at Staples on their laser copy printer for crisper/bolder colors 
Embellishments: Jolee's Stickers
Tools: Martha Stewart Scoring Board & Bone Folder
Free iPhone Valentine Printable Template: www.livinglocurto.com  

Saturday, February 7, 2015

Dusting off the Scrapping Supplies for my 5 year old niece's Class Valentines

According to this blog, I haven't crafted since 2011. Dusting off the scrapping supplies is quite literally true in this case! 

My little niece is 5 years old and in Kindergarten.  My how time flies!

I have some downtime right now and somehow felt compelled to make some Valentines for her to pass out to her classmates.   Like everyone else, I've been pinterest-ing, usually when I can't sleep, and I came across the most adorable little candy treat boxes.

My niece's Valentines were the perfect opportunity to try my hand at making my own version which prompted a visit to a Hobby Lobby in my area because I was desperately searching for this cutting template.  I never even KNEW we had them here locally since I was under the impression they were in other states.  The last and first time I ever set foot in a Hobby Lobby was in Arizona when I attended Heidi Swapp's Creative Escape Convention back in Sept '07. While I'm not in agreement with HL's stance on marriage equality, I was also quite curious as to what HL's appeal was since my last and only visit was well over 7 years ago.  Interesting field trip I must say. Lots of cool home decor that has that mass produced look.  Meh...I can't patronize this corporation.

I also ended up at one of the very first LSS' I found back in the late 90's in my neck of the woods.  Lo and behold, in this day and age of the demise of the scrapping industry and the lss', it's still there but under new ownership.   Incredibly, I was still recognized by the new owner from my active days of scrapping and teaching classes. WOW!

The LSS I specifically went to has a HUGE library of Accucut dies that they allow their customers to use with purchase of product or for a $5 rental fee.  I was more than prepared with a few Artbins full of patterned paper and cardstock I wanted and NEEDED to use up.  None were to my liking since I just couldn't resist this Candy Box Punch Board from We R Memory Keepers.  I ended up buying a new tool with a 40% off coupon even though I have very little desire to buy any more stuff.  I'm loving our current times.  I was able to quickly download the big retail box's app onto my iphone while standing in line to access their 40% off coupon by the time it was my turn at the register. Scrappers have it too easy these days!


So here's my late night frenzied creation using up as many sheets of cutesy patterned paper I already own for my 5 year old niece's class Valentine's.  Thank goodness it was just as easy as grabbing one thin CH vertical holder that was labeled "Valentines." I'm a hoarder so I'm glad I could finally use up this patterned paper print that doesn't quite match my personal style/preference.     


Inside the candy treat box are these cute little panda shaped cookies with chocolate soft filling that my sister in law purchased at Costco! I have to admit that I ate a few of the remaining packets while assembling the treat boxes!


I haven't mass assembled in over a decade since my swapping days.  It was a bit overwhelming at first, but it was just like getting back on a bike.  After I cut out and stamped all my pieces, it was super easy to get into worker bee mode assembling just 22 of these.   I was actually a little sad her class size was only 22 for crafting purposes, as I could have gone on for quite some time.  For educational purposes, class size of 22 is awesome!


I also dashed into Michael's to find a themed ribbon that would provide contrast to my patterned paper.  While I was deciding in front of the bargain ribbon bins, I noticed that Tori Spelling and her two oldest were in the aisle right next to me.  How cool that Tori shops at Michael's! Loved that these ribbon spools were already on sale, so I guesstimated 4 spools which was, thankfully, just enough for this project. I have 9 full artbins of beautifully organized, by color, ribbon that apparently just wasn't right for this project. Something is wrong with me! Oh well, at least I used up about 24 sheets of patterned paper and cardstock.  Then my sister in law gifted me a pad of 12 x 12 paper. Sigh! I can never get ahead! lol, at least I made another small dent. The pad of paper will be used because I love the black/silver/gold motiff!

I'm qualifying this one for the SCS CAS210 "Love is in the Air" Challenge for the week of 2/2/15!!


"Love .... To You From Me Valentine's Treat Boxes"
Paper: Fiskars Cloud 9 Sweetheart Collection PP; Trader Joes circular for the heart shaped book page; Bazzil CS scraps
Stamps: SU Best Yet (to You From Me)
Ink: Michael's SU Red Rose dye ink
Tools: WeR Memory Keepers Candy box Punch Board (scoring/cutting template); QK Nesting Cookie Cutter Heart & Basic Phrases Dies; Family Treasures Scalloped Heart Punch; Gluedots
Embellishments: Michael's $1 bin Valentines themed ribbon

Friday, February 13, 2009

Cuttlebug Stationary Box Tutorial FEATURING Art Freckles "Ticket to Whoo-ville" Kit

Photobucket

As promised in my previous blog post, I have been really excited to share my pictorial tutorial with you that I created for our Fab Friday Tutorial at the Cuttlebug Challenge Blog. I'll admit, this is the most extensive tutorial I've ever done...lol...you'll see as you keep on scrolling.

I fell in love with this Stationary Box that was originally designed by Jackie Topa and I wanted to share with you my version that I created with the February Kit from Art Freckles called "Ticket to Whoo-ville."


This is the outside......


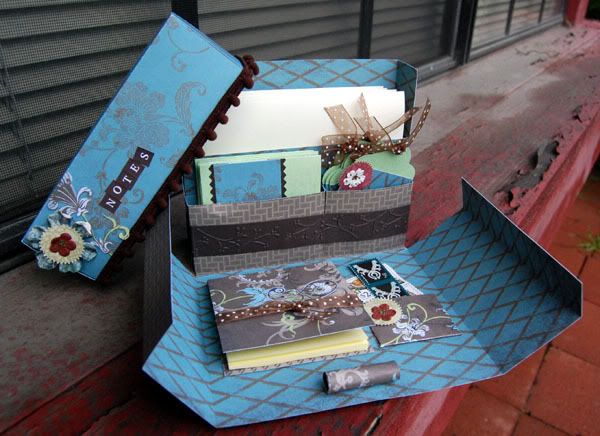
....and this is what the inside looks like.


I created a pictorial tutorial for you if you'd like to make one for yourself. Go grab a cuppa cuz this is going to be a long one. :)

Supplies Needed: (for the stationary box holder and top only)
* 3 pieces of 12x12 cardstock and/or coordinating patterned paper. (In my example, I used only
patterned papers from the Art Freckles kit.)
* Paper Trimmer with trimming AND scoring blade
* Scoring bone to crease your folds
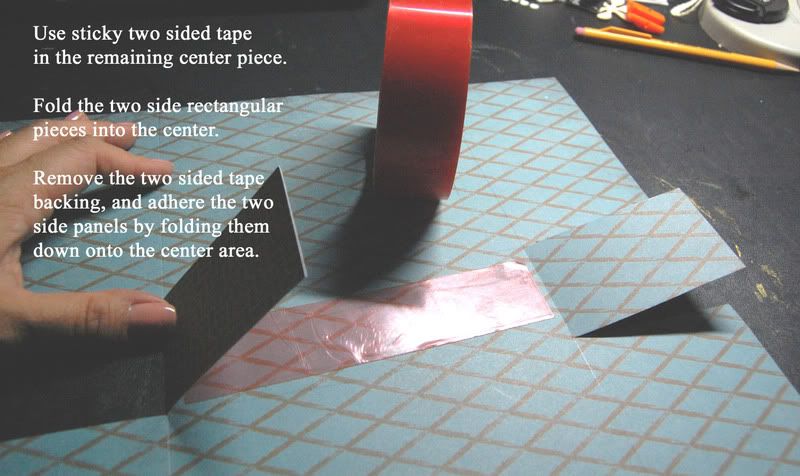
* Red sticky double sided tape
* Embellishments to decorate the outside of your Stationary Box. (In my example, all embellishments except for Prima flower are from the Art Freckles kit.)

Additional Supplies Needed: (for set of 4 tags, 4 qty 3x3 cards and 4 qty 4.25 x 5.5 cards)
* 3 sheets of 12x12 cardstock for card and tag bases.
* Additonal patterned papers and embellishments as required to create these items.
NOTE: The cards and tags will NOT be covered in this tutorial.


PART A: Making the Stationary Box Unit

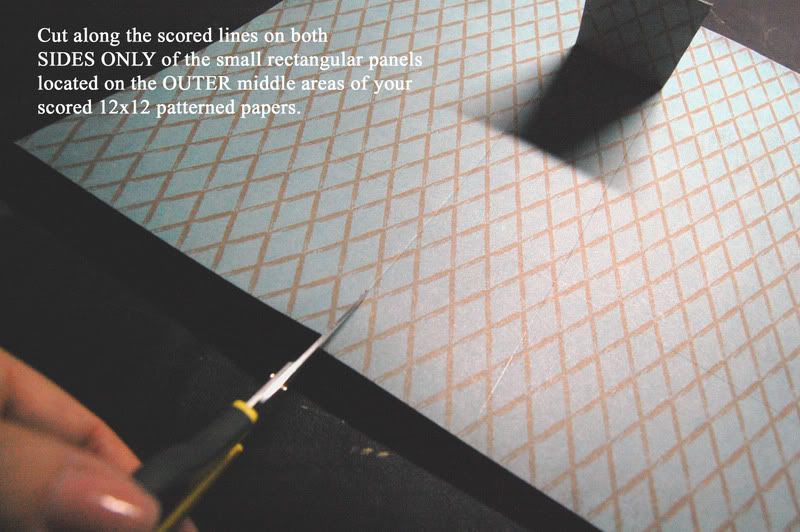
Step #1: Take your first piece of 12 x 12 paper and SCORE IT @ 3 inches and 9 inches.

Step #2: Flip this same piece of 12 x 12 paper around, now SCORE IT @ 5 inches and 7 inches.

Step #3:
Step 4:
Step 5: fold and glue it down like this.


Step 6:


Step 7:

Step 8:

Step 9:

Step 10:


Whoohoo!! If you've gotten this far with me, you've just completed making the outside shell of the Stationary Box!

PART B: Stationary Box Shelves (there are 3 of them)

Step 1:
Step 2:
Step 3:

Step 4:

Step 5:
Step 6:


Step 7:

Step 8:

Step 9:

Step 10:

Step 11:

Step 12:


Step 13: I used the branch border from the Just My Type Cuttlebug folder set to emboss a long length of matching brown cardstock to decorate the front of my shorter "shelves."

(please disregard all the contents in my Stationary box for now.)

Step 14:


Whoohooo! We're almost there to the finish!!
Let's make our Stationary Box top now, shall we?


PART C: Stationary Box Top

Step 1:

Step 2:

Step 3:

Step 4:


Alrighty, we're at the last stretch. Let's make our inside flap doodads, i.e. post it note holder, stamp holder and pen loop.

Here's what the inside doodads look like to keep you motivated to continue on with our little project. :)


PART D: Inside Doodads

Step 1: Cut into a coordinating piece of cardstock or patterned paper at 3.25 x 6.25 dimensions. Score it in the middle, and put a pad of 3x3 post it notes inside. I decorated the top of my post it note holder with some ribbon. Glue the covered pad onto the LEFT side of your inside flap opening of our stationary box.

Step 2:


Step 3:


The stamp pocket is glued to the RIGHT side of the flap and the pen loop is glued nearer the bottom of the flap (when open) as pictured.


Yeeaahh!! We're done! Now, please go ahead and make a few 3x3 cards to insert in the LEFT smaller pocket shelf, some embellished tags for the RIGHT smaller pocket shelf, and some 4.25 x 5.5 cards for your larger pocket shelf in the back. You're on your own for these items as they are not a part of this tutorial.

If you loved the specific supplies I used for my Stationary Box, please visit Art Freckles to see their February "Ticket to Whoo-ville" monthly kit. Shannon, Renee, Linda, and Kimberly are the nicest gals around.

Art Freckles will also be hosting a Cyber Crop at the end of March! Be sure to join us then for lots of fun challenges and prizes!!


Thank you for sitting in with me THIS long for this Stationary Box tutorial. Please join us NEXT Friday, and EVERY Friday, for our Cuttlebug Challenge Blog's Fab Friday series.


Stationary Box (Most items are from Feb Art Freckles Kit)
Paper: Upsy Daisy "Man About Town" Patterned Papers
Embellishments:
Maya Road & May Arts Ribbon; Kaiser Pearl Bling; Rose Moca Tiny Alpha Stickers
Accessories: Cuttlebug Just My Type Embossing Folder; Scoring Blade; Red Double Sided Sticky Adhesive Tape
Size: various

Wednesday, February 11, 2009

My Guest DT Gallery Reveal for Art Freckles

I've been happily fondling these papers from the Art Freckles February Kit called "Ticket to Whoo-ville" for a couple of weeks now. How super cute is this kit?? I'm so thrilled that I got to work with this one for my Guest Design Team project this month for Art Freckles.

Here's a look at the kit:


This Kit Contains:


  • 12 sheets of 12x12 double sided patterned paper from Upsy Daisy Designs 'Man About Town' Line


  •          (2 of each design)
      * Grafton
      * Kent
      * Hunter
      * Decon
      *Carter
      *Nolan

  • 4 sheets of 12x12 Bazzill cardstock (2 ea. of Beetle Black, Sugar Cookie)


  • 2 sheets of 8.5x11 Bazzill cardstock (2 ea. of Apple Crush)


  • 1/2 package of Maya Road brown and cream sheer tickets


  • 1 pkg. Maya Road brown and cream velvet pleats


  • 1 ea. Maya Road owl coaster album


  • 1 yd. Maya Road brown pom pom trim


  • 1 yd. Maya Road cream sequins trim


  • 12" Around The Block boarder tape


  • 1 ea. vinyl scallop circle diecut


  • 1/2 dozen 7 Gypsies brads (various sizes)


  • 1 ea. Rose Moka alpha stickers in brown


  • 1 set of foam die cut flowers


    All this for just $26.50. Click here to order yours now!!

    And here's what I made with this scrumptious Art Freckles kit:

    This first card was inspired by the Cuttlebug Challenge Blog Wednesday Be Inspired Challenges. If you pop on over to the Cuttlebug Challenge Blog, you'll see that we were all supposed to create a shaped card. (I didn't use an embossing folder on this one, so had to sit out our weekly challenge over there this week. But I do hope you check out the Cuttlebug Challenge Blog to play along. )


    I couldn't help myself with this adorable little Maya Road Owl Chipboard book, so I was inspired to find a few of my favorite Suess-isms to put inside my Whoo-ville owl chipboard book.


    Here's what the insides look like:


    And finally, I have been DYING to make one of these Stationary Boxes and this paper just pushed me over the edge to take that plunge!! I absolutely loooove blue with slate gray and brown, can you tell?


    Please come back and visit my blog THIS FRIDAY as I'll be sharing with you a very detailed pictorial tutorial on how to make one of these Stationary Boxes. Its gonna be a long blog post on Friday, so be forewarned and grab a cuppa.

    If you loved the materials I used, please do check out Art Freckles to grab this "Ticket to Whoo-ville" February monthly kit. They are a Canadian based new monthly kit club and are just the nicest gals around. I'm very honored to be a part of Art Freckles this month as their February Guest Design Team Member. Thank you Shannon!!


    "With Love" Card (Most items are from Feb Art Freckles Kit)
    Paper: Upsy Daisy "Man About Town" Patterned Papers; Bazzill Bark CS
    Embellishments:
    Maya Road Ribbon, Felt Flowers & Sheer Journaling Blocks; Misc Felt Red Heart and Cream Sequined Ribbon; Offray Cream Sheer Ribbon; Rose Moca Tiny Alpha Stickers
    Accessories: Dollar Tree Scalloped Scissors; White Uniball Gel Pen; Cropadile; SU Sizzix Bigz Label Die.
    Size: 4" x 3" rectangle

    "Your Ticket to Love" Card (Most items are from Feb Art Freckles Kit)
    Paper: Upsy Daisy "Man About Town" Patterned Papers; Bazzill Bark & Raven CS
    Embellishments:
    Maya Road Felt Flowers & Sheer Journaling Blocks; Kaiser Pearl Bling; Offray Satin Brown Ribbon; Rose Moca Tiny Alpha Stickers
    Accessories: EK Success Cutterbee Scissors
    Size: 6" x 6" square

    "Come Over" Card (Most items are from Feb Art Freckles Kit)
    Paper: Upsy Daisy "Man About Town" Patterned Papers; Bazzill Bark CS
    Embellishments:
    Offray Satin Brown Ribbon; Misc Brown Brads; Kaiser Pearl Bling; Rose Moca Tiny Alpha Stickers
    Accessories: SU Sizzix Bigz Label Die; Cuttlebug Swiss Dots Embossing Folder; QK Revolution Chandelier Die; Scrapbook Adhesive Foam Pop Up; Heidi Swapp Piercing Tool; SU Ticket Corner Punch
    Size: 4.25" x 5.5" rectangle

    "Suess-ism Quotes" Owl Mini Book (Most items are from Feb Art Freckles Kit)
    Paper: Upsy Daisy "Man About Town" Patterned Papers
    Embellishments:
    May Arts Ribbon; Prima Flowers; Maya Road Mini Pom Pom Ribbon, Felt Flowers & Sheer Journaling Blocks; MM & Heidi Swapp Acrylic Paints; Tattered Angeles Glimmer Mist
    Size: varies

    Stationary Box (Most items are from Feb Art Freckles Kit)
    Paper: Upsy Daisy "Man About Town" Patterned Papers
    Embellishments:
    Maya Road & May Arts Ribbon; Kaiser Pearl Bling; Rose Moca Tiny Alpha Stickers
    Accessories: Cuttlebug Just My Type Embossing Folder; Scoring Blade; Red Double Sided Sticky Adhesive Tape
    Size: various
     

    Blog Template by BloggerCandy.com