Showing posts with label Layouts. Show all posts

Wednesday, September 21, 2011

Design Diva's FaceBook Group OBG Blog Hop

I know it's high time I dust off my blog here as it's been FOREVER since I got crafty. I've been so overwhelmed with a SERIOUS reorganization and purge of ALL my crafting supplies that until recently has been spread out between my bedroom, living room and god only knows where else.

I. Just. Couldn't. Function. Anymore.

Know what I mean? I'm still not done yet but I sure miss playing with paper and glue.

So today, I'm hopping along with the talented ladies of the Facebook DIVAs blogging group and forced myself to actually finish something! The theme of the hop is Oldies But Goodies (OBG). The rules are to create an item (card, scrapbook page, framed art, etc.) using at least 1 item in your supplies that you not used for 6 months or more. Join us every 3rd Wednesday each month for a blog hop.

You've arrived here from Maria's blog. If you've arrived here mistakenly and would like to begin at the very beginning, click on over to Carloyn's blog.

Here's my layout of my sweet little niece who is now almost 2 and half years old today but in this layout, this was her very first Thanksgiving with her extended family back in 2009.


I call this old school since I employed NONE of the trends of what's hot today, i.e. no banners, no cleverly placed mixture of strips of lace, patterned papers, border punched strips, etc. The funny thing is that I still like what I like. I can't tell you the last time I was able to reach all my embellishments that I've worked so hard on organizing into drawers and containers, all to be blocked by larger boxes stacked in front of them for years. Yes, I function really well in "organized" messes but I can't tell you how well I'm breathing now with all this space I've been creating for myself with this huge purge I'm undergoing.

I don't care that no one's using chipboard anymore, but I thought these little chipboard phrases were darling and the color was perfect to match with the Basic Grey Indian Summer floral print. Somehow I even found a glittery K & Co red chipboard "K" for my niece's name. I totally forgot about the Maya Road Sheers I used to love so dearly back in the day when they were all the rage. I decided to use one called "This month..." to document all of K's 6 month firsts.

Here's a detailed close up shot of my hand cutting. I still love doing that as it's a great way to tie in elements and color schemes of a page. Here I couldn't resist that vintage polka dot whispy flower from a Prima patterned paper to give this layout that features my baby niece a more decidedly feminine flair to it. I decided to add a few of those burgandy wine berry blossoms twiggy things from the BG Indian Summer patterned paper and layer it all on top of a felt Prima twig sticker I had laying around for hopefully a fall / autumn and yet girly feel.

Ha ha! What fun it was to pull out my mom's sewing machine to give it whirl!! I sewed the borders on the left side to give it some added texture. I can't thank my friend Kari enough for giving me her left over sienna ribbon that is so rich and silky. I thought it was perfect for this layout!

It feels soo good to be scrapping again. Maybe the next one I'll get with the program and employ lots of banners and textured strips of decorative media like everyone else is doing nowadays. But for now, it sure was fun playing with all my old toys that I've been stashing away as if I was going to take it all with me after this lifetime. ;-p

Thanks to my friends of the Design Diva's for getting me to actually take time to play and create.

Thanks for stopping by! Click on over to Angie's blog now.


"Treasure Always"
Paper: Bo Bunny, MM, Prima & BG Indian Summer PP's; Bazzil CS
Embellishments: Prima Felt Stalk & Flower; Maya Road Journaling Sheers;
Lil Davis Small Chipboard Phrases; K&Co Chipboard Glitter Alpha; Misc Silk Ribbon from my friend Kari
Tools: Fiskars Border Punch; Sewing Machine

Tuesday, January 11, 2011

A Thanksgiving Layout

True to my resolutions, I made myself finish this one off that's been in various stages of "finish" the past year.

The picture is from the previous Thanksgiving with my siblings/cousins and their respective kids.

I fell in love with one of the contents from one of the past monthly kits (from Studio Calico I think?) and was inspired to scrap, so I went out to buy a few pieces of patterned papers from BG Indian Summer, Prima and 7 Gyspies to create this layout.

What's cool is that I also incorporated the velvet embossed ric rac ribbon, on the bottom of the layout, from one of Urban Anthology's past kits that I remember shopping for in the Garment District in Downtown LA with UA owner Kari a few summers ago.

And here's what's making me smile from ear to ear because I'm meeting one of my New Year's Resolutions with this ----> I actually pulled out an old old OLD stamp set since I needed a small "Thanksgiving" phrase for the MM Vintage findings tag to complete my layout. Will you believe that's one of those MM magnetic stamp sets from way back in the days?


Here's a close up of the sentiment which was just EXACTLY what I needed:

As you can see, I really had fun mixing the Prima flowers with the K&Co Que Sera Sera dimensional phrase stickers.
  • The turquoise rolled flower was handmade from punching out old dictionary paper using the ever elusive 6 petal flower punch. I love how fragile the dictionary paper and thus how the flower feels. I ended up spritzing it with some Glimmer Mist in xxx color so that it would blend in nicely with my color scheme. As a final touch, I rubbed some gold glitter on the top edges by applying some Stickles.
  • Tee hee, the beaded wired flower was a left over from a package of K&Co embellishments from back in the day when I was making hair clippies for my baby niece.
  • The white leaf stems were donated to me by my sweet friend Eva when I eyed them in her stash. I believe she had cut them on her Silhouette. Anyhoo, I decided to leave them a stark white for the much needed contrast for a crisper look.
Along the top border, I borrowed my friend Karen's Martha Stewart Jumbo border punch to create the velvety brown eyelet band across the top and was able to incorporate an old marigold K&Co journaling frame for some added color contrast with the strip of BG Indian Summer pp.

I definitely had fun with this one and really am happy with how it came out. Here are some more detailed shots of the dimension including a fluttering butterfly I punched using one of my newest (at the time) MS punches.

Here are a few more detailed shots.


Thanks for looking!


"Family"
Paper:
7 Gypsies ? PP; Prima "Island Beauty" PP; Basic Grey Indian Summer "Acorn" PP; Bazzil CS
Embellishments: Basic Grey Indian Summer Sticker Elements; K&Co Que Sera Sera Stitched Adornment Dimensional Stickers & Beaded Flowers; Prima Flowers and Leaves; Misc Velvet Brown Embossed Ric Rac Trim; K&Co Journaling Frame; MM Vintage Findings Scalloped Oval Tag; Pink Paisley Alpha Stickers; "Antique Gold" Stickles; ?? Glimmer Mist
Accessories: MM Magnetic Word Stamps; St; Silohuette Dies; Marvy 6 Petal Flower Punch; Aleene's Tacky Glue; MS Butterfly & Floral Vine Deep Edge Border Punch

Wednesday, June 3, 2009

A New Baby is a Perfect Match for Lily Bee Papers ~ Nook May Kit Projects

I'm sorry I've been remiss in updating my blog.  I'm soooo happy to announce that my niece Kylie is finally here! She was born on Saturday, May 23rd. She's my immediate family's first grandchild so we're all very very excited!!

Here she is using the Nook's May monthly kit featuring the soft pallette of Lily Bee papers. I had this layout done for awhile and was just waiting for a picture to snap in!! Too bad she's in her baby carrier that has a brown lining, but then again, that ended up coordinating with the brown background with white birdie Lily Bee paper.

I did add in a few things from my stash like the eyelet fabric lace that my friend Yolanda gave me ( I think it was a group buy from one of our Downtown LA garment district shopping sprees), the pink Webster's ribbon trim and that super cute foam puffy alpha sticker set I found on sale at Joann's recently when I was shopping for High School Musical scrapping supplies for yet another niece's upcoming birthday album. That "Sweet" tag, the Calendar Month Raffle ticket and that round scalloped journaling spot, all from from Creative Mess, were the perfect finishing touches to this layout. I came so close to making a banner that I cut out of that pink swag the birdies are roosting on, but I couldn't find my new QK banner 2x2 die. Urgh!! Yes, I seriously need to clean! But at the time, I wasn't sure if my layout had room for it due to creating a layout that I had not yet have the photos for. So it goes!

This last layout I created from the Nook's May kit is of a really old picture of me from 2005. I decided to drive down to the Carlsbad Flowerbeds after hearing rave reviews about it forever! I'm glad I did as I enjoyed a very relaxing and introspective stroll on the grounds.


I hand cut long strips from that swirly olive green Lily Bee patterned paper to hand piece a funky frame for my picture. I wanted to grunge it up but decided to keep it clean which is more of a challenge for me, and I'm about trying different styles of scrapbooking right now.

I incorporated orange-y Prima flowers to bring out the orange in my picture, else everything else is from the Nook May Kit. Oh, and of course, I incorporated a journaling tag from the "List Journaling Jotters Set" from Creative Mess. I laid it on top of a double-sided Lily Bee paper just to tie it in better with the top portion of the layout. I finished it off by reaching into my stash, like WAAaaay back, by using this My Minds Eye "Simply Beautiful" pre-fab die cut. The colors and font perfectly tie in.

I'll be back soon with some projects featuring goodies from the Nook's June kit that is just brimming with tons of Cosmo Cricket Early Bird goodness!! Scroll down immediately below this blog post to see it in its full glory!! You HAVE to get one by clicking here to order yours today before it sells out!


"Sweet Baby Girl"
Paper:
Lily Bee "Three Little Birds" PP
Embellishments: Lily Bee "3 Little Birds" Frame Die Cuts; Maya Road Corduroy Flowers; MM Milk Chocolate "Piper" alpha Chipboard; Sandy Lion Girl Foam Alpha Stickers; Misc Eyelet Lace & Silk Fabric Flower; Button from Nook Kit; Webster's Pink Trim; Creative Chaos "Plain Jenns," "Calendar Raffle Ticket" and "Bright White Valentines" Journaling Spots
Accessories: SU Scalloped Border Punch

"Simply Beautiful...California Poppies"
Paper:
Lily Bee "Three Little Birds" PP
Embellishments: Lily Bee "3 Little Birds" Frame Die Cuts; MM Milk Chocolate "Piper" alpha Chipboard; Prima Flowers; MME "Flirty Little Secrets" Title Chipboard; Creative Chaos "List Journaling Jotters Set of 6" Spots
Accessories: n/a

Tuesday, May 19, 2009

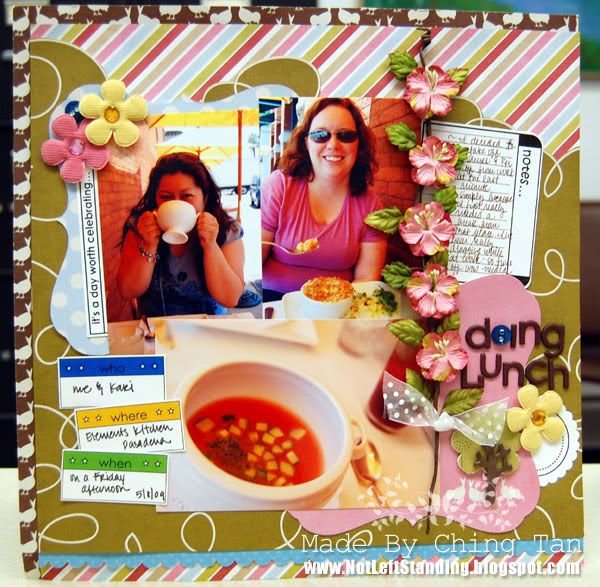
One Page Layout Tutorial using the Nook's May Kit

My net was intermittent and mostly down this past weekend so I'm playing catchup with my bloggity blog tonight. I'm shooing away the janitorial staff here at work so that I can blog in peace!!!

It looks like the Nook's site is down due to some site upgrading work, so I'd like to share my Layout Page class here. (Whew! I had just posted my class on the message board, and then the board didnt' work anymore! lol...surely I didn't break it right?)


Materials Needed: (from Nook's May Kit)
* Lily Bee Diagonal Striped PP
* Lily Bee Olive Green with Squiggly lines like clouds PP
* Bazzil Blue Embossed Cardstock
* Lily Bee Brown with white birds PP
* Lily Bee Frame Die Cuts
* Lily Bee Olive Green with trees PP (you will need 2x2 of this)
* Scallop Edge Scissors/Border Punch
* Maya Road (one each of tree and tree shrubs) chipboard
* A few pieces of blue Kaiser bling (I used 4 gems on my layout)
* 3 of the Puffy Velvet Maya Road flowers
* BG Chipboard alpha
* 2 blue or coordinating colored buttons
* Pencil (not included in kit)
* Creative Chaos Journalling Spots (not included in kit)
* Prima Flower Vine (not included in kit)

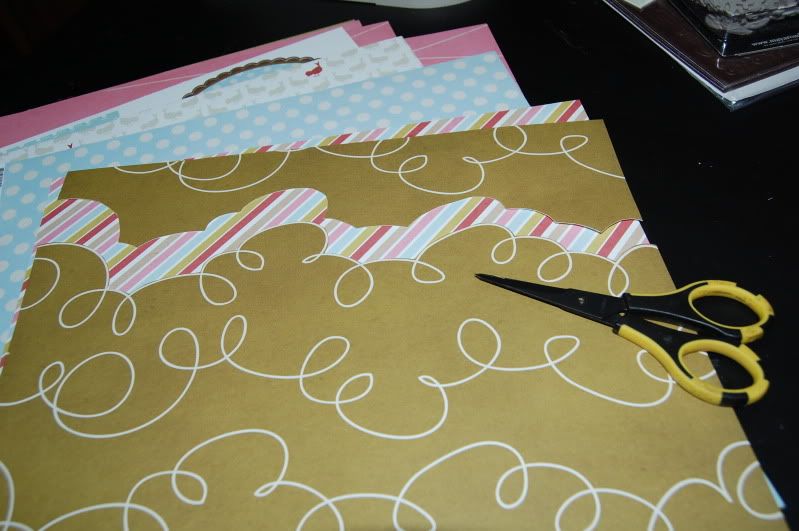
Step 1: Trim off the top portion of the "clouds" of the olive green pp by cutting along the squiggly lines


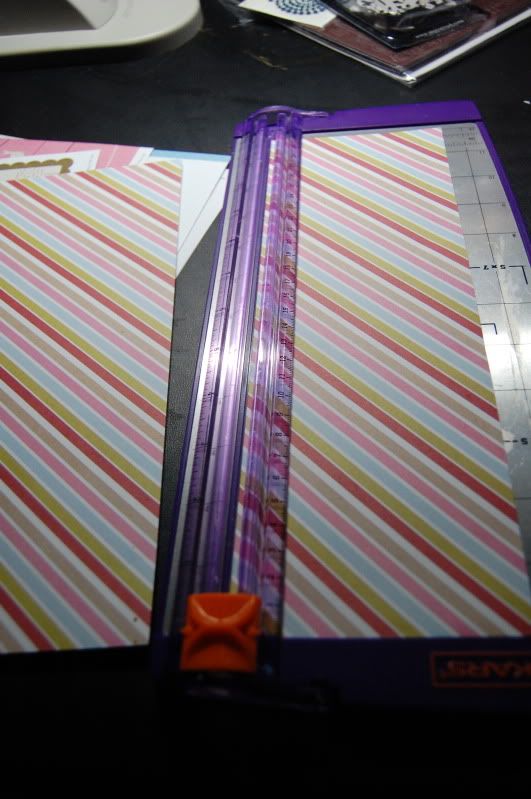
Step 2: Prepare the other PP's by cutting them to size.

* Trim off 4 x 12 inches of the diagonal striped pp
* Trim off 1.5 x 12 inch of the diagonal striped PP
* Trim off 1.5 x 12 inch of the Bazzill embossed cardstock

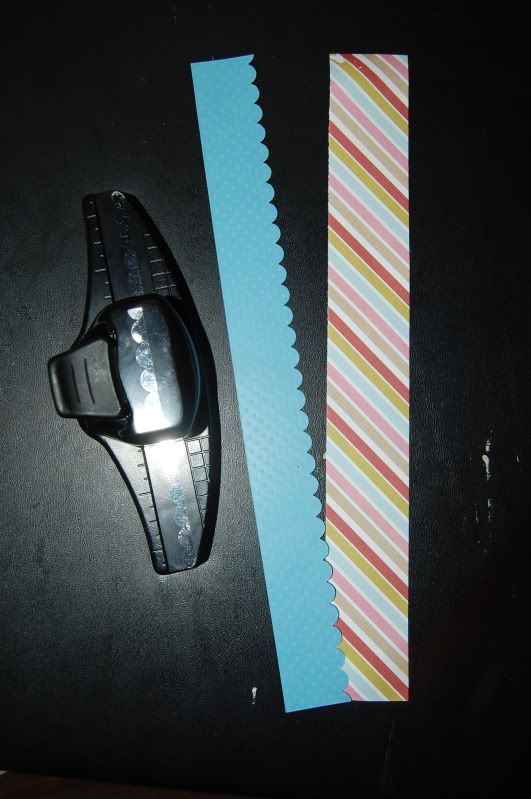
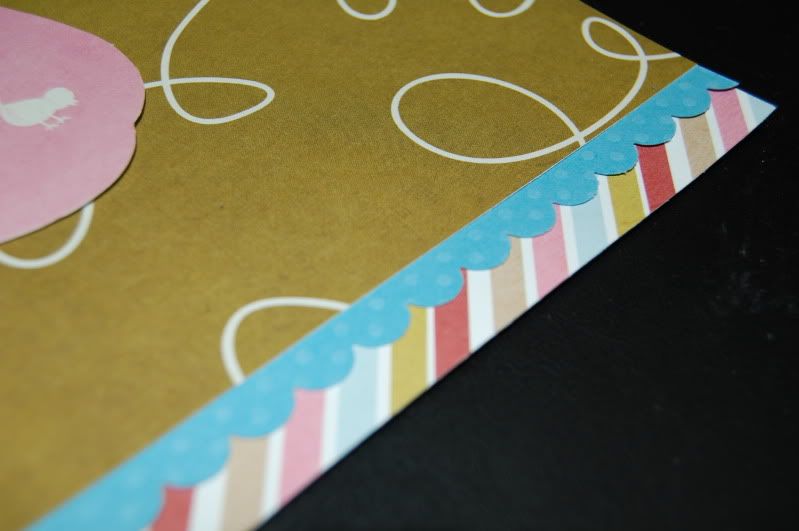
Step 3: Use a scalloped edge pair of scissors or border punch to create a scalloped border on the Bazzill embossed cardstock like this:


Step 4: Glue the scalloped Blue embossed cardstock (with scallops facing towards bottom of the page) onto the diagonally striped 1.5 x 12 inches border, so that the straight edge of the blue cardstock is flush with the border of the diagonally striped pp.

Then glue the straight edge bottom of the Green Olive PP on top of this newly prepared blue cardstock/diagonally striped border like this:


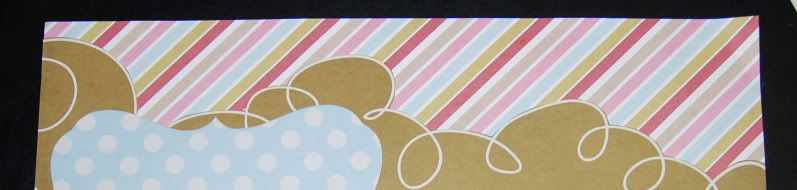
Step 5: Glue the larger piece of the olive green paper that now has a squiggly border on top of the 4 x 12 diagonal striped PP you cut out in Step #2 like this:


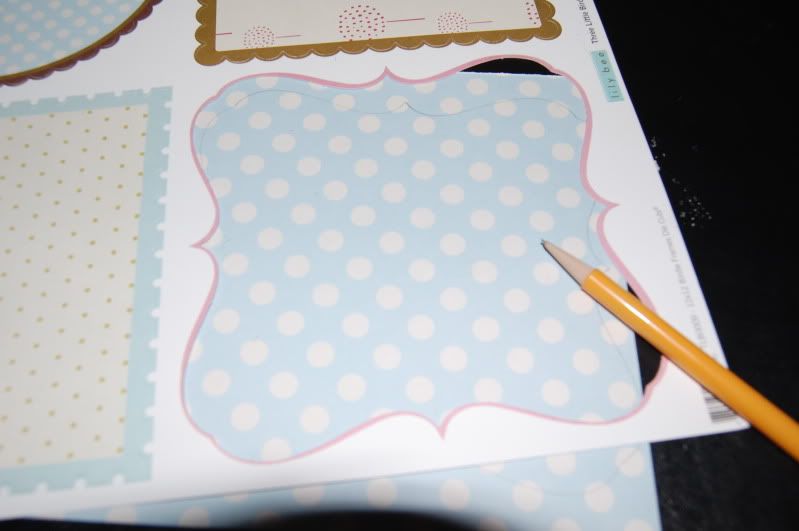
Step 6: Pop out the Pink label shaped Frame die from the die cut paper.

Use the negative opening to trace a 2nd shape with your pencil onto the back side of the diagonally striped paper that you have left - the back side is the baby blue with white polka dots.

Trace it and cut it out.


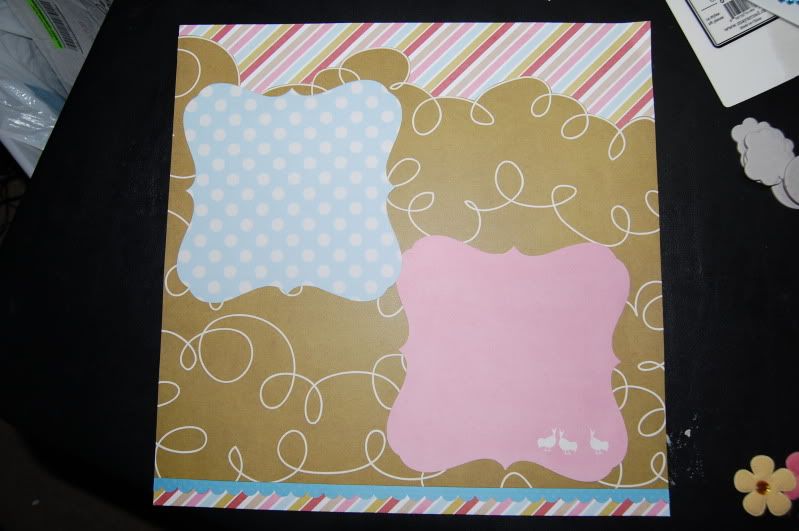
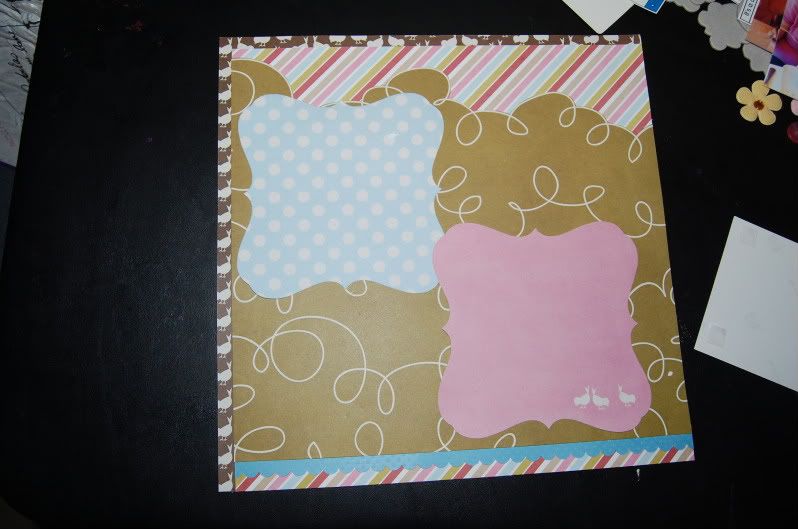
Step 7: Adhere your Blue with white polka dots and Pink label shaped frames onto your page like this (or however it better suits your pictures):


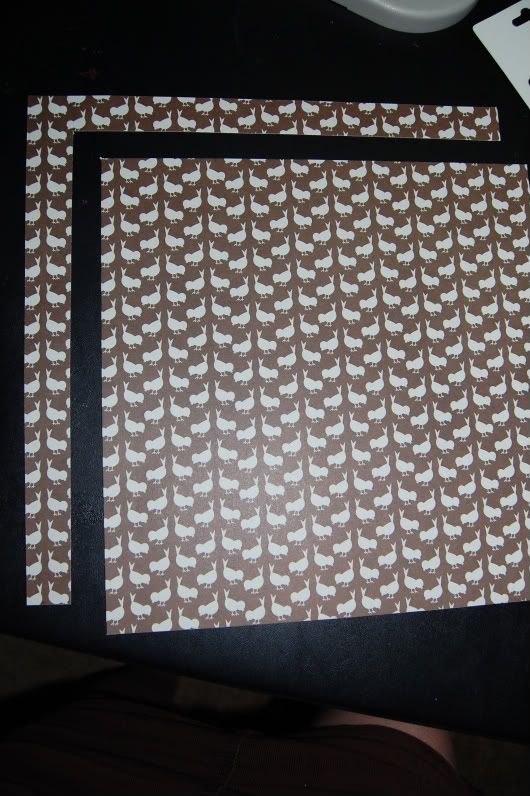
Step 8: I thought for an extra oomp, I wanted to add another patterned paper and color to tie in the brown of the tree I'm going to add a bit later, so I trimmed off an "L" shape (its about 1.5 inches width) from the brown with white birds PP like this:

Step 9: I trimmed about .5 inches from the left and top edges of my layout that was already put together so that I could attach this brown "L" shape for added interest like this:

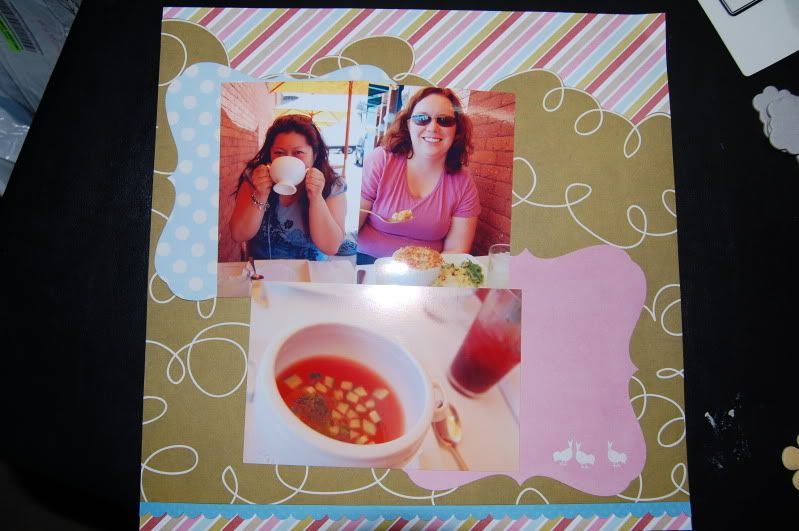
Step 10: Add pictures onto your page by playing up the label shaped photo frames you created:

Step 11: Now add journalling spots (these were not included in the kit and came from my own stash)

Step 12:Paint one of the Maya Road tree stumps brown with some brown acrylic paint. Cover one of the tree shrubbery "clouds" with that Lily Bee Olive Green pp with the trees on it.

TIP: I use UHU gluestick to adhere the pp's to the chipboard, and then use my BG file set to ensure clean edges of my covered chipboard.

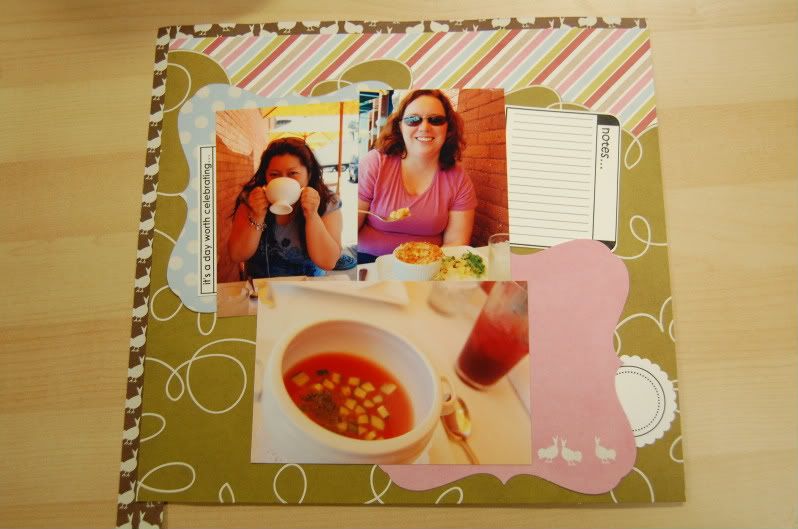
Step 13: Now add your prepared tree, Maya Road fabric flowers, buttons, BG alphas to the layout like this to finish up your layout.

I also added a Prima viney flower from my own stash to the layout.

TIP: I added some blue Kaiser bling to cover the button holes for some added interest.

Voila! You're done!

Hope you enjoyed the class! If you enjoyed this kit featuring Lily Bee, please check out our May Kit at the Nook to get one for yourself! :) I'll be back with a few more projects from this really sweet and pretty May kit this week.


"Doing Lunch (on a Friday Afternoon)"
Paper:
Lily Bee "Three Little Birds" PP; Bazzil Swiss Dots CS
Embellishments: Lily Bee "3 Little Birds" Frame Die Cuts; Maya Road Velvet Flowers & Chipboard; Misc Buttons; Kaiser Bling; MM Milk Chocolate "Piper" alpha Chipboard; Prima Vine Flowr; Creative Chaos "Perfect Little Labels" Journalling Spot
Accessories: SU Scalloped Border Punch

Monday, May 18, 2009

Love Me Some Glitz!!

Its been a long time since I've gotten to choose exactly every single item I want to scrap with since I've scored my DT gigs, so its a bit nerve wracking to do it all from scratch! But ooooh so giddy I was last week.

I saw that The Pink Elephant had an Inspirational Play Along for May using this as a spring board for some creativity:


So when I saw these papers from the new Glitz line called Sparrow last week during my lunch hour, I was hooked!! I was so inspired by a particular layout that was created by the Glitz owners that was being taught at a wonderful lss I had never been to before (Sonja's Scrapbook Shop is located in the LAX area near my alma mater Loyola Marymount), but I wanted to do my own thing to it and make it more ME. I drove back to the store after work the same day to get them because I just couldn't get this gorgeous line out of my head!

Here's my layout:


And here's what I scrap lifted from (its piled on top of their other two layouts that were going to be taught in the class, and I just loved how that darker purple based pp looked, so I decided to incorporate that darker purple pp onto my layout):

In mine, I did add a few more things....lol. More strips of paper from the same Glitz Sparrow line and I did add a journalling spot from Creative Chaos from Jenn's Perfect Little Labels in White Set to commemorate the date.

tfl!


"Beautiful & Exquisite"
Paper:
Glitz "Sparrow" PP; Bazzil CS with an EdgeEmbellishments: Glitz "Sparrow" Cardstock Journalling Stickers & Rubons; Glitz Ornate Frame Rubons & Cardstock Frame Stickers; Glitz & Prima Bling; Prima & Misc Fabric/Felt Flowers; MAMBI "Beautiful" word Bling; American Crafts "Getty" alpha stickers; Creative Chaos "Perfect Little Labels" Journalling Spot
Accessories: SU Retired "Lexicon of Love" Text Stamp; Colorbox "Yellow Citrus" & "Tangerine" Chalk Cats Eye; Versafine Black Ink

Sunday, May 10, 2009

Happy Mother's Day & April's My Scrapbook Nook Projects

Happy Mother's Day Everyone!!

I hope you all are having a lovely day with your families. I was blessed to have been invited by my sister-in-law to join an early Mother's Day outing with her and my mom this past Thursday at the Huntington Gardens. We walked through the gardens while looking through the art exhibits and then enjoyed a lovely tea lunch in their Rose Garden Tea Room.


I took a few days off from work to just decompress and its been a relaxing 4 day weekend so far. Its been awhile since I've updated my blog with scrappy work, so I'm making up for loss time today and I'll have a few more to share with you through out the week. :)


Here's what I created with the April kit from the Nook:

This first one is of my best friend Jim. I've known Jim, it seems for forever, since I walked on that first bus trip to Mammoth with my ski club 13 years ago with a pillow. (See, I was much much MUCH thinner back then, and he saw the big pillow first before me, so its our running joke.) Jim suffered a stroke approximately 3 years ago and has been making incredibly strides in his recovery. We recently went out and had Chinese for lunch before we went out for a movie. It was great seeing how self proficient he is now. Jim, I know you're reading this because I'm going to send you a link to this blog post. Remember, you flashed me in your hospital bed back in Dec 06? You don't remember it, but I will forever have your er...body seared into my memory!! Thank you very much! not! LOL, anyway, yes...we will be going on a trip soon together Jim...I can feel it, its very soon! Jim, we need to do something OUTSIDE of North America next time. (That's what the journalling on the layout says.)


This "Jim" layout features tons of distressed scallops and a big circle which is just what the current challenge over at The Pink Elephant was calling for. :) That site is such a cute challenge site.

The second layout is of my BFF's Susan and Kari. We had a FABULOUS time together at Disneyland on New Year's Eve. I know it was very tiring for them doing Disney all in one day as they're both annual pass holders whereas I'm not. So, being the energizer bunny that I still am, I usually pack it all into one day, once a year. Thanks you two for being such troopers and for your friendship. I just love this picture of all of us.

I did add some swirly bling and Prima Woodstalk flowers from my own stash. I thought this butterfly kraft journalling tag, from Creative Chaos' "This and That" set which will be debuted on Jenn's etsy site on May 11th, was the perfect feminine touch for this rich layout I created using the Nook kit.


In this coming week, I'll be bombarding you with lots of scrappy goodies to make up for lost time.

Definitely check out the gallery to see what the other Nook DT's created with this fabulously gorgeous kit!

Here's the Nook's May Kit which features all this Lilly Bee yumminess!! I just received this in the mail last week, so I'm diving into this one today and will hopefully have something to share in a few days.

Those Lily Bee papers, those little diecut papers and that Webster's Pages trim ~ all to die for! That is the most gorgeous trim. You really have to see it in real life. As always the kit's packed full of goodies with some of my favorites, like the Basic Grey chipboard alphas, Maya Road chipboard trees and velvet flowers, and a handful of bling and buttons. Pure yumminess!


We also have this adorable mini kit featuring French Couture from Lily Bee too as an add on kit.


Would you like a 6 month DT position over at My Scrapbook Nook ? Check us out and play along in our month long Scrap Off to win that DT position. We're having a series of challenges for 5 weeks. Lots of fun and great prizes, including a six month term on the design team! Now that's a prize worth playing for! :)


"Jim"
Paper:
Pink Paislee "Captivating" PP & Prima Packaging (Repurposed)
Embellishments: Pink Paislee "Captivating" Die Cuts (Sticker Book) & Brads; American Crafts Alpha Stickers; Prima & Petaloo Flowers; American Crafts Ribbon; Maya Road Sheers
Accessories: Embroidery Floss; Versafine Brown Ink; SU Distressing Tool

"Susan, Me & Kari"
Paper:
Pink Paislee "Captivating" PP; Jenni Bowlin Black Dictionary PP
Embellishments: Pink Paislee "Captivating" Alphabet (Sticker Book); Prima Bloom Bonnet and Woodstalk Flowers; Prima Bling; Maya Road Sheers; Creative Chaos Journalling Tag
Accessories: Versafine Brown Ink; SU Distressing Tool; HS Poking Tool

Wednesday, April 1, 2009

March Scrapbook Nook Projects & Here's Our April Kit

I still can't quite get over how ethereally beautiful this Ever After paper line from Cosmo Cricket is. Thankfully, the March My Scrapbook Nook Kit was chalk FULL of it, so I could loll in it til my heart's content!

I obviously have wedding on the mind (not that I'm doing anything remotely CLOSE to getting engaged!) and here's what I came up with. Man, this paper is beautiful!! Did I say that already??

My first project is a Wall Hanging utilizing those large metal frames from Basic Grey that turned up at Big Lots for something like $2.50 each! I grabbed a few of those as I was really inspired by a similar project designed/taught by Candice Carpenter a few years ago. The ivory frames were a perfect complement to the Cosmo Cricket Ever After papers. I'm pleased with how my version came out. The picture is of my brother and his wife on their wedding day last April. (He he, and they have a baby on the way already, who's due in mid-May! Dang, those two don't waste any time, huh?)


I wanted to take a break from cards for awhile, so I was thrilled that one of my local cropping groups was going to the Pinecone Press location for a crop a few weeks ago. Pinecone Press, as you know, is a great manufacturer of products and pre-packaged kits, etc. Their headquarters is completely stocked with ALL the Accucut dies ever made!! I was in heaven!! I wanted to try out all these boxes and shapes that I was too lazy to measure/cut out on my own using patterns I've found on line. So, yes, I got to play with all those dies and here's what I came up with.

I'm either going to use this as a bridal shower invitation or as a little gag gift to the next friend of mine who gets married. This little purse is scored in such a way on the bottom that I could actually fit a few sheets of papers in between, so I could include tips, funny anecdotes, items for a survival kit, etc.

Then, I'm always out of ideas for place settings/table favors!! So I worked up a few mock samples.


I've always loved this photo of my sister in law on her wedding day. She had a damn good photographer, didn't she? I kept this one fairly flat because my SIL's style isn't as lumpy as mine.

Definitely check out the gallery to see what the other Nook DT's created with this fabulously gorgeous kit! We still have a few of the March Kits left, so definitely get yours before they're completely sold out!

Before I sign off, I gotta show you our April kits!! Yes, I intended for kits to be plural!! We have two kits this month; one of them is a special limited one!

Here's our April kit at the Nook:

I'm diving into it now and will hopefully have some projects to share with you after this weekend. I absolutely LOVE Pink Paislee!!

And here's our Limited Edition Spring Kit: (more Pink Paislee goodness!)

And very last thing, I promise, before I go. The Nook is featuring a card per day using the March, April, and May kits for a month. Definitely come play along with us or just visit for inspiration in our card forum!

Alright kiddos, its time to hit the road for me. (I've got lots more to update the rest of this week!)


"Wedding" Wall Hanging
Paper:
Cosmo Cricket "Ever After" PP; Chipboard
Embellishments: Cosmo Cricket "Ever After" Die Cuts & Chipboard; Cream Tulle; Jenni Bowlin Jeweled Ivory Button; Misc Cream Flowers; Misc Iridescent Pearl Beaded Ribbon; Offray Cream Satin Ribbon; Basic Grey Alpha Stickers; Basic Grey Ivory Metal Frames
Accessories: Perfect Paper Adhesive; Glue Dots

"Bridal Purse"
Paper: Cosmo Cricket "Ever After" PP
Embellishments: Cosmo Cricket "Ever After" Die Cuts & Chipboard; Cream Tulle; Jenni Bowlin Jeweled Ivory Button; Prima Lace; Misc Iridescent Pearl Beaded Ribbon; Misc Brown Wired Satin Ribbon
Accessories: Accucut Purse Die; Glue Dots; Double Sided Sticky Tape

"Cake Tower Place Setting / Favor"
Paper: Cosmo Cricket "Ever After" PP
Embellishments: Cosmo Cricket "Ever After" Die Cuts; Misc Cream Flowers; Offray Cream Satin Ribbon
Accessories: Accucut Cake and Topper Dies; Glue Dots; Double Sided Sticky Tape

"Cake Favor"
Paper: Cosmo Cricket "Ever After" PP
Embellishments: Misc Iridescent Pearl Beaded Ribbon; Misc Large Silk Flower
Accessories: Accucut Cake Dies; Glue Dots; Double Sided Sticky Tape; Scalloped Scissors

"Happily Ever After"
Paper:
Cosmo Cricket "Ever After" PP
Embellishments: Cosmo Cricket "Ever After" Die Cuts & Chipboard; Cream Tulle; Jenni Bowlin Jeweled Ivory Button; Misc Cream Flowers; Offray Cream Satin Ribbon; Prima Lace and Pearl Swirly
Accessories: Glue Dots
 

Blog Template by BloggerCandy.com